|
|
Field
|
Value
|
|
|
Invoice Number
|
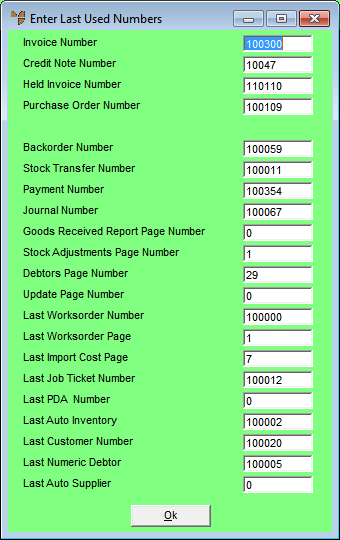
Micronet displays the last used invoice number. For example, if this field displays 100019, the next invoice number would be 100020. You can change this if required, remembering to enter one number less than what you want the next invoice number to be.
|
|
|
Credit Note Number
|
Micronet displays the last used credit note number. You can change this if required.
|
|
|
Held Invoice Number
|
Micronet displays the last used number for held invoices. You can change this if required.
|
|
|
Purchase Order Number
|
Micronet displays the last used purchase order number. You can change this if required.
|
|
|
Backorder Number
|
Micronet displays the last used backorder number. You can change this if required.
|
|
|
Stock Transfer Number
|
Micronet displays the last used stock transfer number. You can change this if required.
|
|
|
Payment Number
|
Micronet displays the last used payment number for creditor payment transactions. This is a unique audit number that is automatically assigned to every transaction that is sent from MCL to MGL to provide a clear and traceable audit path. Micronet automatically assigns these payment numbers to link a supplier payment to multiple dissections. For example, if you pay four invoices with one cheque (payment), Micronet creates a link from this payment to each invoice paid. This link can be used for reports, inquiries and drilling through your data.
You can change this if required.
|
|
|
Journal Number
|
Micronet displays the last used number for creditor journal transactions. You can change this if required.
|
|
|
Goods Received Report Page Number
|
Micronet prints audit reports detailing transactions entered to the ledgers. These reports print as sequential page numbers that can be filed numerically.
Enter the last page number to be used on Goods Received reports. This field defaults to zero at initial setup. Therefore, the first audit report page number prints as Page 1.
|
|
|
Stock Adjustments Page Number
|
Enter the last page number to be used on Stock Adjustments reports.
|
|
|
Debtors Page Number
|
Enter the last page number to be used on debtors audit reports.
|
|
|
Update Page Number
|
|
|
|
Last Worksorder Number
|
Micronet displays the last used works order number. You can change this if required.
|
|
|
Last Worksorder Page
|
|
|
|
Last Import Cost Page
|
|
|
|
Last Job Ticket Number
|
Micronet displays the last used job number. You can change this if required.
|
|
|
Last PDA Number
|
|
|
|
Last Auto Inventory
|
Micronet displays the last used item number. You can change this if required.
|
|
|
Last Customer Number
|
Micronet displays the last used debtor number. You can change this if required.
|
|
|
Last Numeric Debtor
|
Micronet displays the last used numeric debtor number. You can change this if required.
|
|
|
Last Auto Supplier
|
Micronet displays the last used supplier/creditor number. You can change this if required.
|
